Greetings, and welcome to Seeseenayy.
Below is the tutorial for the RSE Packet Tracer (Final / Practice) for CCNA2, detailing both versions of this packet tracer. There is no download, as both of these are online only. The formatting for this packet tracer is slightly odd, though I think you'll adjust.
This packet tracer includes both Version 1 (HQ, Site 1, Site 2, etc), as well as Version 2 (Central, Police, Fire, etc). This tutorial is mostly just the commands with text spaced everywhere.
Please read version 1 and version 2 for any errors, as version 1 received only a score short of 100 (94). Check version 2 as well.
Tutorial


Version 1 (Site 1, Site 2, HQ, etc) Version 2 (Central, Police, Fire, etc)
VERSION 1
We're going to start out by doing Version 1, for an expanded view of how this packet tracer looks, click here. If not, let's get into it!
Alright, I did Version 1, and my score was a 94%, short of 100. I can't post the scoring guide as it's copyright protected, but I missed ONLY two items:
- Network:[[R2Name]]:ACL:1
- Network:[[R2Name]]:Routes:StaticRoutesV2:192.168.200.022Serial0/0/101
I believe it was a mis-spelling of the addresses, but it's not hard. Just add that IP on S0/0/1's static route (R2) or correct the one I goofed on.
Starting off, connect a console cable from the PC to the closest router. For this tutorial, we'll be starting on Site 1 (router). We need to configure BASIC settings, such as host-name, motd, line/vtys, secrets, and some other general options. The code, as asked, is as follows:
Router>en
Router#conf t
Router(config)#hostname Site-1
Site-1(config)#no ip domain-lookup
Site-1(config)#enable secret class
Site-1(config)#service password-encryption
Site-1(config)#line console 0
Site-1(config-line)#logging synchronous
Site-1(config-line)#password cisco
Site-1(config-line)#login
Site-1(config-line)#exit
Site-1(config)#line vty 0 15
Site-1(config-line)#password cisco
Site-1(config-line)#login
Site-1(config-line)#exit
Site-1(config)#banner motd "Authorized Access Only - Router Site 1"
Site-1(config)#exit
We then have to actually configure things. IPs, VLANs, etc. Follow along, it's a lot of code.
Site-1>en
Site-1#conf t
Site-1(config)#int s0/0/0 (serial configuration)
Site-1(config-if)#bandwidth 128
Site-1(config-if)#ip add 192.168.10.105 255.255.255.252
Site-1(config-if)#desc "Site-1 Site 1 -> Site-1 HQ"
Site-1(config-if)#clock rate 128000
Site-1(config-if)#no sh
Site-1(config-if)#exit
Site-1(config)#ip route 0.0.0.0 0.0.0.0 S0/0/0 (routing, ipv4)
Site-1(config)#int g0/0
Site-1(config-if)#no sh
Site-1(config-if)#exit
Site-1(config)#int g0/0.45 (vlan/trunk/related initial configuring)
Site-1(config-subif)#encapsulation dot1Q 45
Site-1(config-subif)#ip add 192.168.45.1 255.255.255.0
Site-1(config-subif)#exit
Site-1(config)#int g0/0.47
Site-1(config-subif)#encapsulation dot1Q 47
Site-1(config-subif)#ip add 192.168.47.1 255.255.255.0
Site-1(config-subif)#exit
Site-1(config)#int g0/0.101
Site-1(config-subif)#encapsulation dot1Q 101
Site-1(config-subif)#ip add 192.168.101.1 255.255.255.0
Site-1(config-subif)#exit
Site-1(config)#Site-1 ospf 10 (OSPF for IPv4, Router side)
Site-1(config-Site-1)#Site-1-id 1.1.1.1
Site-1(config-Site-1)#network 192.168.10.104 0.0.0.3 area 0
Site-1(config-Site-1)#network 192.168.45.0 0.0.0.255 area 0
Site-1(config-Site-1)#network 192.168.47.0 0.0.0.255 area 0
Site-1(config-Site-1)#network 192.168.101.0 0.0.0.255 area 0
Site-1(config-Site-1)#passive-int g0/0.45
Site-1(config-Site-1)#passive-int g0/0.47
Site-1(config-Site-1)#passive-int g0/0.101
Site-1(config-Site-1)#exit
Site-1(config)#int s0/0/0 (Missed configuring this, here it is now).
Site-1(config-if)#bandwidth 128
Site-1(config-if)#ip ospf cost 7500
Site-1(config-if)#exit (DHCP is next)
Site-1(config)#ip dhcp excluded-address 192.168.45.1 192.168.45.20
Site-1(config)#ip dhcp excluded-address 192.168.47.1 192.168.47.20
Site-1(config)#ip dhcp pool VLAN45 (VLAN-ing!)
Site-1(dhcp-config)#network 192.168.45.0 255.255.255.0
Site-1(dhcp-config)#default-Site-1 192.168.45.1
Site-1(dhcp-config)#dns-server 192.168.18.100
Site-1(dhcp-config)#exit
Site-1(config)#ip dhcp pool VLAN47 (More VLAN-ing!)
Site-1(dhcp-config)#network 192.168.47.0 255.255.255.0
Site-1(dhcp-config)#default-Site-1 192.168.47.1
Site-1(dhcp-config)#dns-server 192.168.18.100
Site-1(dhcp-config)#exit
So, at this point, we're done with Router 1 (Site-1), so disconnect the console cable and reconnect it to the second router, which (for us) is HQ. (It's closest-ish)
As done before, this router will house basic settings, routes, ospf, and NAT! (Spooky)
Router>en
Router#conf t
Router(config)#hostname HQ
HQ(config)#no ip domain-lookup
HQ(config)#enable secret class
HQ(config)#service password-encryption
HQ(config)#line console 0
HQ(config-line)#logging synchronous
HQ(config-line)#password cisco
HQ(config-line)#login
HQ(config-line)#exit
HQ(config)#line vty 0 15
HQ(config-line)#password cisco
HQ(config-line)#login
HQ(config-line)#exit
HQ(config)#banner motd "Authorized Access Only: HQ Router"
HQ(config)#
HQ(config)#int s0/0/0
HQ(config-if)#ip add 192.168.10.106 255.255.255.252
HQ(config-if)#bandwidth 128
HQ(config-if)#no sh
HQ(config-if)#exit
HQ(config)#int s0/0/1
HQ(config-if)#bandwidth 128
HQ(config-if)#ip add 192.168.10.114 255.255.255.252
HQ(config-if)#clock rate 128000
HQ(config-if)#no sh
HQ(config-if)#exit
HQ(config)#int g0/0
HQ(config-if)#ip add 192.168.18.41 255.255.255.248
HQ(config-if)#no sh
HQ(config-if)#exit
HQ(config)#int s0/1/0
HQ(config-if)#ip add 198.51.100.1 255.255.255.240
HQ(config-if)#no sh
HQ(config-if)#exit
HQ(config)#ip route 0.0.0.0 0.0.0.0 s0/1/0
HQ(config)#router ospf 10
HQ(config-router)#router-id 2.2.2.2
HQ(config-router)#network 192.168.10.104 0.0.0.3 area 0
HQ(config-router)#network 192.168.10.112 0.0.0.3 area 0
HQ(config-router)#network 192.168.18.40 0.0.0.7 area 0
HQ(config-router)#passive-interface g0/0
HQ(config-router)#exit
HQ(config)#int s0/0/0
HQ(config-if)#bandwidth 128
HQ(config-if)#ip ospf cost 7500
HQ(config-if)#exit
HQ(config)#int s0/0/1
HQ(config-if)#bandwidth 128
HQ(config-if)#exit
HQ(config)#ip nat inside source static 192.168.18.46 198.51.100.14
HQ(config)#int g0/0
HQ(config-if)#ip nat inside
HQ(config-if)#exit
HQ(config)#int s0/1/0
HQ(config-if)#ip nat outside
HQ(config-if)#exit
HQ(config)#ip nat pool INTERNET 198.51.100.3 198.51.100.13 netmask 255.255.255.240
HQ(config)#ip nat inside source list 1 pool INTERNET
HQ(config)#ip nat inside source static 192.168.18.46 198.51.100.14
HQ(config)#ip access-list standard 1
HQ(config-std-nacl)#permit 192.168.45.0 0.0.0.255
HQ(config-std-nacl)#permit 192.168.47.0 0.0.0.255
HQ(config-std-nacl)#permit 192.168.200.0 0.0.0.255
HQ(config-std-nacl)#exit
HQ(config)#access-list 101 permit ip host 203.0.113.18 any
HQ(config)#access-list 101 permit tcp any host 198.51.100.14 eq www
HQ(config)#access-list 101 permit tcp any any established
HQ(config)#access-list 101 deny ip any any
HQ(config)#line vty 0 15
HQ(config-line)#access-class MANAGE in
HQ(config-line)#password cisco
HQ(config-line)#login
HQ(config-line)#exit
We will pause our configuration to move on to Site-2. We've done all we need for HQ's configuration so far. Note: the acl configuration for HQ is evidently incorrect somewhere-- the name is one issue I believe.
Router>en
Router#conf t
Enter configuration commands, one per line. End with CNTL/Z.
Router(config)#hostname Site-2
Site-2(config)#no ip domain-lookup
Site-2(config)#enable secret class
Site-2(config)#service password-encryption
Site-2(config)#line console 0
Site-2(config-line)#logging synchronous
Site-2(config-line)#password cisco
Site-2(config-line)#login
Site-2(config-line)#line vty 0 15
Site-2(config-line)#password cisco
Site-2(config-line)#login
Site-2(config-line)#exit
Site-2(config)#banner motd "Authorized Access Only - RT Site 2"
Site-2(config)#int s0/0/1
Site-2(config-if)#bandwidth 128
Site-2(config-if)#ip add 192.168.10.113
% Incomplete command.
Site-2(config-if)#ip add 192.168.10.113 255.255.255.252
Site-2(config-if)#desc "Router Site 2 -> Router HQ"
Site-2(config-if)#no sh
Site-2(config-if)#exit
Site-2(config)#ip route 0.0.0.0 0.0.0.0 s0/0/1
Site-2(config)#ip route 192.168.200.0 255.255.252.0 s0/0/0
Site-2(config)#exit
Site-2(config)#router ospf 10
Site-2(config-router)#router-id 3.3.3.3
Site-2(config-router)#network 192.168.10.112 0.0.0.3 area 0
Site-2(config-router)#int s0/0/1
Site-2(config-if)#bandwidth 128
Site-2(config-if)#exit
Site-2(config)#int s0/0/0
Site-2(config-if)#no sh
Site-2(config-if)#exit
We're going to configure the switch at this point.
S1>en
S1#conf t
Site-1-SW1(config)#hostname Site-1-SW1
Site-1-SW1(config)#no ip domain-lookup
Site-1-SW1(config)#enable secret class
Site-1-SW1(config)#service password-encryption
Site-1-SW1(config)#line console 0
Site-1-SW1(config-line)#password cisco
Site-1-SW1(config-line)#login
Site-1-SW1(config-line)#logging synchronous
Site-1-SW1(config-line)#exit
Site-1-SW1(config)#line vty 0 15
Site-1-SW1(config-line)#logging synchronous
Site-1-SW1(config-line)#password cisco
Site-1-SW1(config-line)#login
Site-1-SW1(config-line)#exit
Site-1-SW1(config)#banner motd "Authorized Access Only - Site 1: Switch 1"
Site-1-SW1(config)#exit
Site-1-SW1#conf t
Site-1-SW1(config)#vlan 45
Site-1-SW1(config-vlan)#name finance
Site-1-SW1(config-vlan)#vlan 47
Site-1-SW1(config-vlan)#name sales
Site-1-SW1(config-vlan)#vlan 101
Site-1-SW1(config-vlan)#name netadmin
Site-1-SW1(config-vlan)#exit
Site-1-SW1(config)#
Site-1-SW1(config)#int g0/1
Site-1-SW1(config-if)#switchport mode trunk
Site-1-SW1(config-if)#no sh
Site-1-SW1(config-if)#exit
Site-1-SW1(config)#int g0/2
Site-1-SW1(config-if)#switchport mode trunk
Site-1-SW1(config-if)#no sh
Site-1-SW1(config-if)#exit
Site-1-SW1(config-if)#switchport mode access
Site-1-SW1(config-if)#switchport access vlan 45
Site-1-SW1(config-if)#no sh
Site-1-SW1(config-if)#exit
Site-1-SW1(config)#int f0/10
Site-1-SW1(config-if)#switchport mode access
Site-1-SW1(config-if)#switchport access vlan 45
Site-1-SW1(config-if)#no sh
Site-1-SW1(config-if)#exit
Site-1-SW1(config)#int f0/15
Site-1-SW1(config-if)#switchport mode access
Site-1-SW1(config-if)#switchport access vlan 47
Site-1-SW1(config-if)#no shutdown
Site-1-SW1(config-if)#exit
Site-1-SW1(config)#ip default-gateway 192.168.101.1
Site-1-SW1(config)#int vlan 101
Site-1-SW1(config-if)#ip add 192.168.101.2 255.255.255.0
Site-1-SW1(config-if)#exit
Site-1-SW1(config)#int range f0/1-9
Site-1-SW1(config-if-range)#exit
Site-1-SW1(config)#int range f0/1-9, f0/11-14, f0/16-24
Site-1-SW1(config-if-range)#switchport mode access
Site-1-SW1(config-if-range)#shutdown
Site-1-SW1(config-if-range)#exit
We're going to move down to Switch 2 on Site 1.
Switch>en
Switch#conf t
Switch(config)#hostname Site-1-SW2
Site-1-SW2(config)#no ip domain-lookup
Site-1-SW2(config)#enable secret class
Site-1-SW2(config)#service password-encryption
Site-1-SW2(config)#line console 0
Site-1-SW2(config-line)#logging synchronous
Site-1-SW2(config-line)#password cisco
Site-1-SW2(config-line)#login
Site-1-SW2(config-line)#exit
Site-1-SW2(config)#line vty 0 15
Site-1-SW2(config-line)#password cisco
Site-1-SW2(config-line)#login
Site-1-SW2(config-line)#logging synchronous
Site-1-SW2(config-line)#exit
Site-1-SW2(config)#banner motd "Authorized Access Only - Site 1 Switch 2"
Site-1-SW2(config)#vlan 45
Site-1-SW2(config-vlan)#name finance
Site-1-SW2(config-vlan)#exit
Site-1-SW2(config)#vlan 47
Site-1-SW2(config-vlan)#name sales
Site-1-SW2(config-vlan)#exit
Site-1-SW2(config)#vlan 101
Site-1-SW2(config-vlan)#name netadmin
Site-1-SW2(config-vlan)#exit
Site-1-SW2(config)#int g1/1
Site-1-SW2(config)#int g0/1
Site-1-SW2(config-if)#switchport mode trunk
Site-1-SW2(config-if)#no sh
Site-1-SW2(config-if)#exit
Site-1-SW2(config)#int fa0/3
Site-1-SW2(config-if)#switchport mode access
Site-1-SW2(config-if)#switchport access vlan 45
Site-1-SW2(config-if)#no sh
Site-1-SW2(config-if)#exit
Site-1-SW2(config)#int fa0/21
Site-1-SW2(config-if)#switchport mode access
Site-1-SW2(config-if)#switchport access vlan 47
Site-1-SW2(config-if)#no shutdown
Site-1-SW2(config-if)#exit
Site-1-SW2(config)#ip default-gateway 192.168.101.1
Site-1-SW2(config)#int vlan 101
Site-1-SW2(config-if)#ip add 192.168.101.3 255.255.255.0
Site-1-SW2(config-if)#exit
Site-1-SW2(config)#int range fa0/1-2,fa0/4-20,fa0/22-24
Site-1-SW2(config-if-range)#switchport mode access
Site-1-SW2(config-if-range)#shutdown
Site-1-SW2(config-if-range)#exit
Site-1-SW2(config)#
Site-1-SW2(config-if-range)#exit
Site-1-SW2(config)#exit
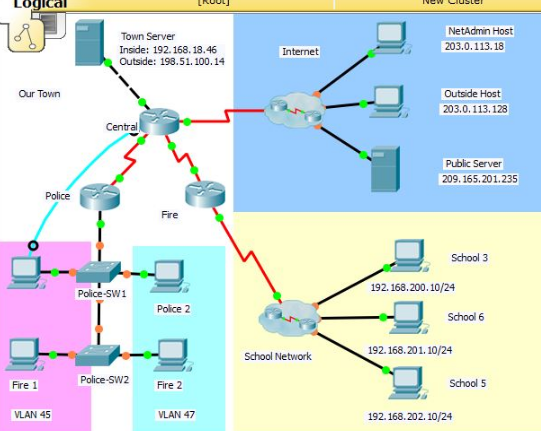
VERSION 2
We're now on version 2 of this packet tracer. For an expanded view of how this packet tracer looks, click here. (I did not do Part 2, so most of this is from CCNA5.NET. I've moved around some things) If not, let's get to it!
Connect your console cable from one PC to one of the routers. For this example, we'll start on the police department.
Router(config)# hostname PoliceDept
PoliceDept(config)# no ip domain-lookup
PoliceDept(config)# enable secret class
PoliceDept(config)# line con 0
PoliceDept(config-line)# logging synchronous
PoliceDept(config)# line console 0
PoliceDept(config-line)#password cisco
PoliceDept(config-line)#login
PoliceDept(config)# line vty 0 4
PoliceDept(config-line)#password cisco
PoliceDept(config-line)#login
PoliceDept(config)# service password-encryption
PoliceDept(config)# banner motd “Authorized Access Only - Police Dept RT"
Then, we must configure our interfaces with IPs and other specifics...
PoliceDept(config)# interface Serial0/0/0
PoliceDept(config-if)#bandwidth 128
PoliceDept(config-if)#ip address 192.168.10.105 255.255.255.252
PoliceDept(config-if)#description Police and Central
PoliceDept(config-if)#clock rate 128000
PoliceDept(config-if)#no shutdown
To continue this configuration elsewhere, connect the console cables to Central & Fire.
Central:
Central(config)# interface Serial0/0/0
Central(config-if)#bandwidth 128
Central(config-if)#ip address 192.168.10.106 255.255.255.252
Central(config-if)#no shutdown
Central(config)# interface Serial0/0/1
Central(config-if)#bandwidth 128
Central(config-if)#ip address 192.168.10.114 255.255.255.252
Central(config-if)#clock rate 128000
Central(config-if)#no shutdown
Central(config)# interface g0/0
Central(config-if)#ip address 192.168.18.41 255.255.255.248
Central(config-if)#no shutdown
Central(config)# interface Serial0/1/0
Central(config-if)#ip address 198.51.100.1 255.255.255.240
Central(config-if)#no shutdown
Fire:
Fire(config)# interface Serial0/0/1
Fire(config-if)#bandwidth 128
Fire(config-if)#ip address 198.51.100.1 255.255.255.240
Fire(config-if)#no shutdown
Then for our IP routes...
PoliceDept(config)#ip route 0.0.0.0 0.0.0.0 s0/0/0
Central(config)#ip route 0.0.0.0 0.0.0.0 s0/1/0
Central(config)#ip route 192.168.200.0 255.255.252.0 s0/0/1
Fire(config)#ip route 0.0.0.0 0.0.0.0 s0/0/1
Fire(config)#ip route 192.168.200.0 255.255.252.0 s0/0/0
Then, we will go back to our respective routers and configure OSPF with the correct qualifications.
PoliceDept:
PoliceDept(config)#router ospf 10
PoliceDept(config-router)#router-id 1.1.1.1
PoliceDept(config-router)#network 192.168.10.104 0.0.0.3 area 0
PoliceDept(config-router)#network 192.168.45.0 0.0.0.255 area 0
PoliceDept(config-router)#network 192.168.47.0 0.0.0.255 area 0
PoliceDept(config-router)#network 192.168.101.0 0.0.0.255 area 0
PoliceDept(config-router)#passive-interface g0/0.45
PoliceDept(config-router)#passive-interface g0/0.47
PoliceDept(config-router)#passive-interface g0/0.101
PoliceDept(config)#interface s0/0/0
PoliceDept(config-if)#bandwidth 128
PoliceDept(config-if)#ip ospf cost 7500
Central:
Central(config)#router ospf 10
Central(config-router)#router-id 2.2.2.2
Central(config-router)#network 192.168.10.104 0.0.0.3 area 0
Central(config-router)#network 192.168.10.112 0.0.0.3 area 0
Central(config-router)#network 192.168.18.40 0.0.0.7 area 0
Central(config-router)#passive-interface g0/0
Central(config)#interface s0/0/0
Central(config-if)#bandwidth 128
Central(config-if)#ip ospf cost 7500
Central(config)#interface s0/0/1
Central(config-if)#bandwidth 128
Fire:
Fire(config)#router ospf 10
Fire(config-router)#router-id 3.3.3.3
Fire(config-router)#network 192.168.10.112 0.0.0.3 area 0
Fire(config)#interface s0/0/1
Fire(config-if)#bandwidth 128
The next step will be doing VLANs and related, so we're going to get PoliceDept's part done while we're still near the routers.
PoliceDept(config)# interface g0/0
PoliceDept(config-if)#no sh
PoliceDept(config)# interface g0/0.45
PoliceDept(config-subif)#encapsulation dot1Q 45
PoliceDept(config-subif)#ip address 192.168.45.1 255.255.255.0
PoliceDept(config)# interface g0/0.47
PoliceDept(config-subif)#encapsulation dot1Q 47
PoliceDept(config-subif)#ip address 192.168.47.1 255.255.255.0
PoliceDept(config)# interface g0/0.101
PoliceDept(config-subif)#encapsulation dot1Q 101
PoliceDept(config-subif)#ip address 192.168.101.1 255.255.255.0
So, we're essentially done with the configurations. From here on, we'll be focusing mainly on the respective switches that belong to the routers.
First, we should configure the switches near our "home" router, which is our switch.
Our first switch is Police-SW1, which is simply VLANs and such.
Police-SW1(config)#vlan 45
Police-SW1(config-vlan)#name HR
Police-SW1(config)#vlan 47
Police-SW1(config-vlan)#name records
Police-SW1(config)#vlan 101
Police-SW1(config-vlan)#name comm
Police-SW1(config)#int g1/1
Police-SW1(config-if)#switchport mode trunk
Police-SW1(config-if)#no shutdown
Police-SW1(config)#int g1/2
Police-SW1(config-if)#switchport mode trunk
Police-SW1(config-if)#no shutdown
Police-SW1(config)#int fa0/10
Police-SW1(config-if)#switchport mode access
Police-SW1(config-if)#switchport access vlan 45
Police-SW1(config-if)#exit
Police-SW1(config)#int fa0/15
Police-SW1(config-if)#switchport mode access
Police-SW1(config-if)#switchport access vlan 47
Police-SW1(config-if)#exit
Police-SW1(config)#ip default-gateway 192.168.101.1
Police-SW1(config)#interface vlan 101
Police-SW1(config-if)#ip address 192.168.101.2 255.255.255.0
Police-SW1(config)#int range fa0/1-9, fa0/11-14, fa0/16-24
Police-SW1(config-if-range)#switchport mode access
Police-SW1(config-if-range)#shutdown
Police-SW2 shares the same principal as the other switch configuration.
Police-SW2(config)#vlan 45
Police-SW2(config-vlan)#name HR
Police-SW2(config)#vlan 47
Police-SW2(config-vlan)#name records
Police-SW2(config)#vlan 101
Police-SW2(config-vlan)#name comm
Police-SW2(config)#int g1/1
Police-SW2(config-if)#switchport mode trunk
Police-SW2(config-if)#no shutdown
Police-SW2(config)#int fa0/3
Police-SW2(config-if)#switchport mode access
Police-SW2(config-if)#switchport access vlan 45
Police-SW2(config-if)#exit
Police-SW2(config)#int fa0/21
Police-SW2(config-if)#switchport mode access
Police-SW2(config-if)#switchport access vlan 47
Police-SW2(config-if)#exit
Police-SW2(config)#ip default-gateway 192.168.101.1
Police-SW2(config)#interface vlan 101
Police-SW2(config-if)#ip address 192.168.101.3 255.255.255.0
Police-SW2(config)#int range fa0/1-2, fa0/4-20, fa0/22-24
Police-SW2(config-if-range)#switchport mode access
Police-SW2(config-if-range)#shutdown
Now, we'll be returning to the router of these switches to enable DHCP. Commands as follows.
PoliceDept(config)#ip dhcp excluded-address 192.168.45.1 192.168.45.20
PoliceDept(config)#ip dhcp excluded-address 192.168.47.1 192.168.47.20
PoliceDept(config)#ip dhcp pool VLAN45
PoliceDept(dhcp-config)#network 192.168.45.0 255.255.255.0
PoliceDept(dhcp-config)#default-router 192.168.45.1
PoliceDept(dhcp-config)#dns-server 192.168.18.100
PoliceDept(config)#ip dhcp pool VLAN47
PoliceDept(dhcp-config)#network 192.168.47.0 255.255.255.0
PoliceDept(dhcp-config)#default-router 192.168.47.1
PoliceDept(dhcp-config)#dns-server 192.168.18.100
Then, set the PCs (PC1-PC4) to get their IP addresses via DHCP.
Afterwards, go to Central (Router) and configure NAT as follows:
Central(config)#ip nat inside source static 192.168.18.46 198.51.100.14
Central(config)#interface g0/0
Central(config-if)#ip nat inside
Central(config)#interface s0/1/0
Central(config-if)#ip nat outside
As well as creating this ACL. Read the instructions on where/what to apply it.
ip access-group 101 in
ip nat outside
access-list 1 permit 192.168.45.0 0.0.0.255
access-list 1 permit 192.168.47.0 0.0.0.255
access-list 1 permit 192.168.200.0 0.0.3.255
ip access-list standard MANAGE
permit host 203.0.113.18
access-list 101 permit ip host 203.0.113.18 any
access-list 101 permit tcp any host 198.51.100.14 eq www
access-list 101 permit tcp any any established
access-list 101 deny ip any any
At this point you should have full/near full credit. Make sure you configured your PCs to get their IP/info via DHCP and ensure the ACL (from above and beyond) is applied and configured correctly.
Thank you, and have a good one.

0 comments:
Post a Comment